


This mouth-watering recipe is ready in just 2 hours and 10 minutes and the ingredients detailed below can serve up to 1 person.


Ingredients
Method
White Chocolate Icing
In a stand-up mixer or in a large bowl with electric beaters, beat butter until fluffy.
Beat in cooled melted chocolate on medium speed. Reduce speed and beat in icing sugar, vanilla and salt (icing will be a little soft). Chill for about an hour to set before using.
Icing can be made ahead and chilled for up to a week, or wrapped and frozen up to a month (thaw refrigerated). Once thawed, beat to make fluffy, then use.
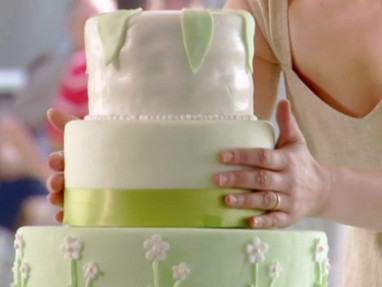
White Chocolate Berry Wedding Cake
Preheat oven to 325 F (160 C). Grease and flour a 10-inch (25 cm) cake pan with 3-inch (8 cm) sides and line bottom with parchment paper.
In a stand-up mixer or in a large bowl with electric beaters, beat butter and sugar until fluffy. Add eggs one at a time, mixing well after each addition, and stir in vanilla.
In a separate bowl, sift flour, baking powder and salt. Add flour to butter mixture in 4 additions, alternating with milk, blending well after each addition.
Melt chocolate in a bowl over barely simmering water, stirring until almost melted.
Remove from heat and continue to stir until melted. Pour warm chocolate into cake batter while blending.
Pour into prepared pan and bake until a tester inserted in the center of the cake comes out clean, about 45 minutes.
Allow cake to cool 30 minutes, then remove from pan to cool completely. Wrap cake and store frozen or at room temperature until ready to assemble.
To assemble, slice cake horizontally into three layers. Spread about 2/3 cup of icing on bottom layer, and spread 1/3 cup of icing on next layer.
Sprinkle mixed berries over iced bottom layer and place next layer on top, with iced-side down, so that icing holds berries in place.
Repeat with next layer. Ice outside of cake on top and sides to cover and level. Chill.
Cake Decorating
To prepare rolling fondant:
To tint fondant, add a little of the colour paste to a small ball (about ½ cup) of fondant and knead well.
Add this ball to a larger portion of fondant (about 3 lbs, for the 14-inch, 1 ½ lbs for the 10-inch, 1 lb for the 8-inch and ½ lb for the 6-inch tiers) and knead by hand or in a mixer fitted with the paddle attachment (not electric beaters).
Adjust colour as needed by adding more colour to intensify the tone, or more fondant to lighten the tone.
This cake uses a darker green for the base, gradually working up to a pale green for the 6-inch tier.
Lightly dust your rolling surface with icing sugar and start by rolling the darkest green fondant for the 14-inch tier.
Roll out a circle ¼ -inch (5 mm) thick. Keep remaining fondant covered at all times. Use your rolling pin to roll up fondant and lift it gently over the 14-inch (35 cm) tier.
Unroll fondant over cake and gently use your hands to adhere fondant to icing. Trim fondant from base of cake and rub surface of fondant in a circular direction to create a smooth surface.
If any air pockets appear, use a pin to release the air and rub the spot gently with your finger to erase the hole.
Repeat this process with the remaining tiers. Take advantage of trimmed excess fondant to cut out small leaf patterns with a small leaf cutter and set aside (it is OK if they dry out).
To stack tiers, they must be stabilized with wooden doweling. Insert a length of doweling into base tier, at least 4-inches (10 cm) from the outside edge.
Mark on the doweling where the cake reaches and remove.
Cut doweling at that mark and cut 4 more identical in length (this ensures the cake will sit level). Insert the dowelling into cake in a circle and gently place 10-inch (25 cm) tier on top.
Repeat this step with the 10-inch (25 cm) and 8-inch (20 cm) tiers.
To transport a cake of this size and weight, it is recommend to take it in two pieces and assemble on-site. Stack the bottom 2 tiers together, and stack the top two tiers.
To decorate cake, start with the bottom tier, wrapping with green ribbon. Fill a piping bag fitted with a small plain tip with green royal icing and pipe a stem design sprouting from the ribbon.
Use royal icing to adhere leaves onto stem design. Repeat desired patterns and piping on each tier (use your own creativity or follow the photo of this cake for design inspiration).
Royal Icing
For royal icing, stir together all ingredients to blend, then beat with electric beaters on high speed until mixture is stiff, about 7 minutes.
Tint icing as desired. Cover surface of icing directly with plastic wrap and store at room temperature until ready to use.