


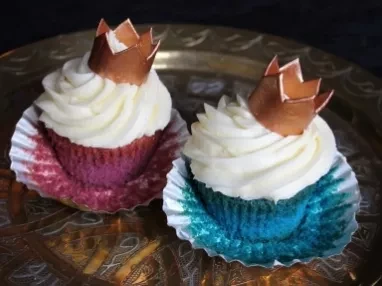
Prince or Princess Cupcakes
This mouth-watering recipe is ready in just 40 minutes and the ingredients detailed below can serve up to 12 people.
Related Recipes

Ingredients
Method
Have you ever wondered how best to let your friends, family, and assorted world leaders know whether you are expecting a little Prince or a little Princess? Fear not, because these easy ‘gender reveal’ cupcakes are a delicious way to share your happy news.
At this point, I should point out that ‘gender reveal’ cupcakes are nowhere near as cheeky as they sound. A new feature of the Baby Shower has been the expectant parents presenting their guests with a cake, iced in white or non-gender specific colours, which conceals a sponge that has been dyed either blue or pink. When the cake is cut, the colour of the sponge within reveals the type of baby that the couple is expecting. Love it or hate it, this is big in America so expect it to be big here soon!
In order to make this all a little less daunting, I have created a cupcake version of this concept for you to try on your own friends and family – though please feel free to also send a few to the Obamas if you have their address.
Pre heat your oven to 180° / 350°F / Gas Mark 4
Cream the butter and sugar together until they are pale and creamy. Never underestimate the time that it will take to complete this step – allow 5 minutes in a freestanding mixer with the flat paddle attachment if you can, remembering to scrape down the bowl every few minutes.
Add one egg at a time, allowing each egg to be fully incorporated before adding the next.
Add the vanilla extract. It is really important that you use the best quality vanilla that you can afford for these cupcakes to counter any taste of the food colouring!
Sift the flour and baking powder into a separate bowl and add to your wet ingredients in thirds. Use your mixer on its slowest speed and stop mixing as soon as the flour is incorporated.
Add a little milk to make a dropping consistency – the cake mixture should dollop off of the flat paddle like thick cream.
Stir through your chosen colour. You need to use a high-intensity food colouring for this job as the colour will fade during baking so try not to worry if they look a little violent at this stage. I am not going to tell you that you won’t end up with a blue tongue after eating these...
Spoon into sturdy foil cupcake cases, which will be able to conceal the colour of your cupcakes. This will not work with paper cases. Bake in a preheated oven for 20 mins or until risen and springy to the touch.
Allow your cupcakes to cool completely on a wire rack before topping with a swirl of vanilla buttercream.
To make the vanilla buttercream, roughly carve up 250g of soft unsalted butter and beat in a freestanding mixer using the paddle attachment for 3 minutes until pale and creamy.
Add 2tsp good quality vanilla extract or the seeds from a vanilla pod
Once your flavour is fully incorporated, add 250g icing sugar and beat for 1 minute. Check the consistency of your buttercream – you are aiming for the thickness of thick whipped cream – if your buttercream is too runny, add another 100g icing sugar. You will then need to beat the buttercream for a further 5 minutes, until the icing sugar is completely incorporated. We want the buttercream to be light and fluffy.
Prepare a 12” disposable plastic piping bag with a large open star nozzle and fill ½ full of your buttercream. Close up the end of your piping bag and twist until the buttercream is just starting to come out of the nozzle.
Hold your piping nozzle straight above your cupcake starting from the outer edge, gently squeeze a line of buttercream onto your cupcake in a spiral working from the outside into the centre of your cupcake. Make sure that you completely cover the edges of your cupcake so that no-one gets a sneaky peak at the colour inside! When you get to the centre of your cupcake, stop squeezing and lift your piping nozzle away. You should be left with a Mr Whippy effect on top of your cupcake.
You may even wish to finish your cupcake off with a tiny sugar crown! I have made mine by mixing ½ tsp of Tylose Powder (CMC) into 100g of white sugarpaste and rolling out into 12 strips of 10cm x 2cm. Cut a spiked edge into the top of each strip while still flat and rolled up into a crown shape, securing the edges with a small amount of water on a paintbrush. Leave these to dry overnight before painting with Dark Gold Metallic Food Paint. Once the paint has dried, you can arrange these on top of your cupcakes.
Sugar crowns can be made up to 1 week in advance if stored in a cardboard box. Do not store in an airtight container as they will go sticky.
Have fun announcing the gender of your baby and God Save the Queen!
Recipe courtesy of Charlotte White from Restoration Cake.
Charlotte’s first book will be published by Ryland Peters & Small in Spring 2014.