


Raspberry and Lemon Easter Cake
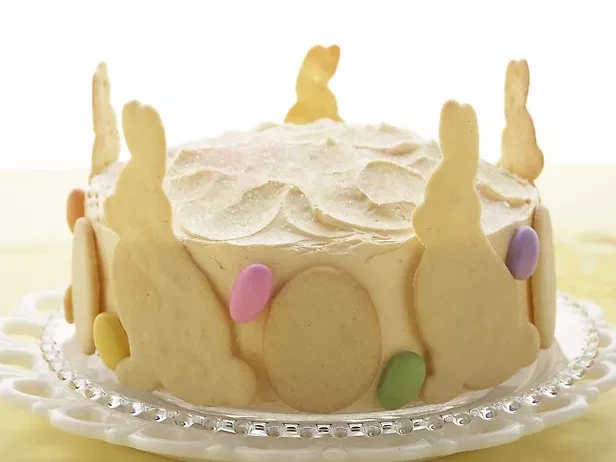
Welcome the Easter Bunny with this sweet and seasonal cake.


Ingredients
Method
1) Position a rack in the lower third of the oven and preheat the oven to 180C/Gas 4. Lightly brush 2 (23cm) round cake tins with butter or shortening. Line the bottoms with buttered greaseproof paper and dust with flour.
2) Sift the flour, baking powder, soda and salt into a medium bowl; whisk to combine evenly. Stir the sour cream, lemon juice and vanilla together in a liquid measuring cup, and set aside.
3) Beat the butter in a standing mixer with the paddle attachment on high until light and creamy, about 2 minutes. Stop and scrape butter off the sides of the bowl. Continue beating while gradually adding the sugar – it should take a couple of minutes to add all the sugar. Continue beating until very light and fluffy, about 3 to 4 minutes more. Scrape down the sides of the bowl and beat in the lemon zest. Add the eggs, 1 at a time, beating well after each addition.
4) At low speed add the flour mixture in 3 parts, alternating with the sour cream in 2 parts, beginning and ending with the flour. Scrape the sides of the bowl and mix for 15 seconds longer.
5) Divide the batter evenly between the prepared tins and smooth the top with a knife. (Lightly tap the tinn on the counter so the batter settles evenly.)
6) Bake the cakes until a cocktail stick inserted in the centre comes out clean, about 35 to 40 minutes. Cool in the tin on a rack for 20 minutes, then turn the cakes out onto the rack to cool completely.
For the icing:
1) Bring a about 10cm of water to a boil in a saucepan that can hold the bowl of a mixer above the water. Whisk the sugar, the egg whites, lemon juice, cream of tartar and salt in the bowl by hand. Set the bowl above the boiling water and continue whisking until the mixture is hot to the touch and the sugar dissolves, about 1 to 2 minutes.
2) Transfer the bowl to a standing mixer fitted with the whisk attachment and beat the whites at medium-high speed until they almost hold a stiff peak and are cool, about 10 minutes. Beat in the butter, a little at a time, until the icing is smooth and spreadable. (If the icing separates, just keep beating and it will come back together.)
To assemble the cake:
1) Slice each cake in half horizontally with a serrated knife, to make 4 even layers, taking care that they are as flat and straight as possible.
2) Set a large flat plate on a large inverted bowl or bottom of a salad spinner (or on a cake stand, if you have one), dabbing a little icing on the bottom of the plate to secure it. Place a cake layer top side up on the plate.
3) Using an offset spatula spread about half the jam in a thin layer over the first cake layer, leaving about 0.5cm border along the outside. Lay the second cake layer on top, stacking it as straight as possible. Using an offset spatula spread about 1 cup of the icing on the top layer. Place a third cake layer on top. Spread remaining red raspberry jam over the cake layer and place the final layer on top, pressing down lightly to secure all 4 layers together.
4) Spread about 3/4 of the remaining icing around the sides with a knife or offset spatula, then ice the top of the cake. Use an offset spatula to smooth icing as much as possible.
5) Press plain or iced cookies around the sides, taking care to leave space to cut the cake. Garnish with additional candied almonds and sprinkle the top of the cake with pastel colored sanding sugars.
6) Serve immediately or set aside at room temperature for up to 2 hours before serving. If refrigerating the cake, bring to room temperature 30 minutes before serving.
Cook's Note: Double wrap the cake in cling film and store in the freezer for up to 2 months.
To make the rabbit sugar biscuits:
1) Whisk the flour, baking powder and salt in a medium bowl.
2) Beat the butter and both sugars in another medium bowl with an electric mixer on medium-high speed until light and fluffy, about 30 seconds. Add the eggs and vanilla mixing until fully incorporated. Slowly add the flour mixture, and continue beating just until the dough comes together, stopping and scraping down the sides of the bowl as needed.
3) Divide the dough in half, pat into disks, wrap in cling film and refrigerate until firm, at least 2 hours.
4) Generously flour a clean work surface. (For a nice, even layer of flour, lightly sift flour over the work surface.) Gently roll the chilled dough about 0.5cm thick. Cut into the desired shape using a biscuit cutter, working quickly enough so dough remains chilled. If dough gets too soft, refrigerate on a lined baking sheet until firm again, about 30 minutes.
5) Transfer the biscuits to un-greased baking sheets, leaving about 2.5cm between each. Refrigerate the formed biscuits for at least 30 minutes. Lightly dust off excess flour with a dry pastry brush. (Excess dough can be pressed into a disk, chilled and rerolled.)
6) Preheat the oven to 170C/Gas 3. Bake the biscuits until the bottoms are golden, about 12 to 15 minutes depending on shape. Cool on the baking sheets until firm enough to transfer to a rack to cool. Decorate as desired and serve. Store in an airtight container at room temperature for up to 1 week.